Openings on 13 x 13
Contents
Hex Openings
-- Adapted with permission, from content originally created by Jonatan Rydh, recovered from https://web.archive.org/web/20070214100026/http://www.nada.kth.se/~rydh/Hex/openings.html. --
Note that Jonathan Rydh compiled the statistics in 2007 (or before), and that current win percentages, etc., may have changed.
Introduction
On this page, I will consider some usual Hex openings for the 13×13 board. The observations are based on around 10,000 correspondence games played by beginners as well as experts. As is the common case, the swap rule will be utilized. This rule says that after the first stone has been placed, the second player may choose to switch sides. This is to remove the big advantage the first player would otherwise havet. Everything on this page should be taken with a grain of salt. It is based on actual played games, many which may be a beginner against another beginner. This is why, for example, only 81% of the games which started with G7 are won (or lost if you take in the fact of the swap rule). That being said, there might be some useful info to ponder upon. Just don't complain to me if your game is lost because you followed any of my advice.
The first move
Due to the swap rule, the first move should not be too good nor too bad. It happens that most hexes on the board are too good to start with, so the number of good first moves is quite limited. The following diagram shows the percentage of games won for each opening move. The first stone to be placed is black. Since the board looks the same when rotated by 180°, the diagram only considers half of the board. The hexes that lack numbers are very rarely played, but not necessarily bad moves. (Although a hex somewhere near the center is definitely a bad move.) Typically a good starting move has a winning percentage around 50%. If it is higher, we would swap it, and if less, we would not. The most common opening moves played are A3, B2 and A2, in that order, all in the acute corner of the board. Other moves to consider are C2, D2, E2, A11, A12 and other moves along the A column.
(See the discussion on the LittleGolem forums Hex 13x13 Openings for more current statistics)
As a general principle, one can say that it's not too bad to swap all moves but A1, B1, ... , L1. However, whether A3, B2, A2, etc., are winning or not has not been proved, and it's much of a personal preference whether to swap or not. The strength of having a stone on, for example, A2 is of course its function as a ladder escape. A2 and B2 and other stones on the second row can be used as second and third row ladder escapes, and A3 can be used as second row ladder escape and will help getting down third and fourth rows as well. Personally, I don't swap A3 and B2 as much as I used to. It seems getting the strategically important positions as quick as possible is more important than having the first stone.
The second move
After the swap phase is finished, it's time to make the first really important move. We now assume you connecting from left to right. Typically your opponent has a stone in either A2, A3 or B2 (marked as 1 in the diagram below).
Most players now play the middle hex G7 (marked 2 in the diagram below). Statistically, this seems to be a bad move, as more than half of the games are lost after this move. No matter where the first stone is placed, the best responses to G7 seem to be K10 or J9 (marked as 3 in the diagram below), which usually end up with a win. However if your opponent responds with a move like H7, F7 or I6 (marked as * in the diagram below) you are quite well off with your middle stone.
It should be stressed though that many strong players play G7 and do well. Statistically it doesn't seem so but it's very hard to tell with statistics.
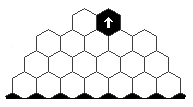
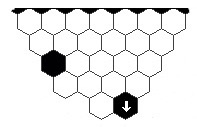
A good alternative to G7 is I10 or J11. For the horizontal player, these moves are equivalent with the previously mentioned vertical player's K10 and J9. One reason these are good as both second and third moves are the one-stone templates:
|
|
|
In other words, this stone is connected downwards with a strong connection. It's quite optimally placed, further down would be too far from the centre and further up would be too far from the edge, thus not connected. In another way of seeing it, J9 for the vertical player lies pretty much in the center of the right half triangle of the board. It can be used as a ladder escape from the left and is dangerous upwards.
Another idea as second move is to block the opponent's first stone by playing in the top acute corner (assuming she played there). This should be done in a similar manner as above. A template should exactly match into the space right of the opponent's stone. If it is at A3, the typical blocking move should be D6, as shown in the diagram below.
Similarly if Red's first move is at A2, Blue may play at D5.
For a response to Red's first move of B2, the block would go at E6.
A warning should be made: do not use the usual third row template for this purpose, as this is too weak a threat. For example, the response C4 of B2 usually ends up bad. Whether a block in this manner is a good idea or not is up to discussion; it seems it's better than playing in the center, but not quite as strong as playing I10 or J11.
The move A3
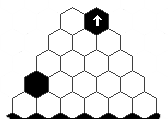
It's not a bad idea to swap A3. The main reason being the following templates:
|
|
|
The A3 stone is the the one on the left. The pattern probably generalizes to bigger dimensions as well but I haven't checked this. The point being that it can be used quite effectively to "jump up" when having a ladder on third row.
So how do you respond if you find yourself playing against A3? The following table shows the nine most common answers sorted by their rate of winning the game in the end. Ideas what to play and not to play as third move are collected in the third and fourth column. These are sorted by winning percentage from left to right (and in case of bad responses, from worse to less worse). Note that the most common response, which is G7 (the center square), is rather far down the list. Good responses typically lie in the opposite acute corner along the diagonal.
|
|
|
|
|
|
|
|
I9, K10
|
G7, F8, G8, H8, G9, H9, G10, H10
|
|
|
|
F8
|
H9, F10, G7
|
|
|
|
F8, F9
|
J10
|
|
|
|
H6, F7, K10
|
G7, H7, E6, F6, F8, G8
|
|
|
|
J9, H6
|
G7, F8
|
|
|
|
J9, F9, G7
|
H9
|
|
|
|
I8, J9, K10, I7
|
K6, D9, I6, F8, F7, H7, J6
|
|
|
|
K10, I8, J9, H8
|
G7, E8, G8, H7, I7
|
|
|
|
K10, J9, E7, F7
|
F6
|
The move B2
The second most common opening move is B2, with about equal strength and possibilities as A3. The big advantage of B2 is that, unlike A3, it's a solid third row ladder escape. The disadvantage lies perhaps in the vertical direction, where A3 probably is slightly stronger. It's not entirely true though, three very useful templates in this corner are:
The two leftmost templates can also be used with A2 as well as B2. The third cannot and but it is basically the same template as the one to the left.
Responses to B2 are quite similar to A3, with a few exceptions: D6 are now a bad idea, instead E6 and D5 take its place. The best moves still seem to lie in the opposite acute corner.
|
|
|
|
|
|
|
|
E9?, D11?
|
G7
|
|
|
|
G7?, F8?
|
F9, I9, H6
|
|
|
|
G10?
|
G7, I10, H9
|
|
|
|
G7
|
F6, G6, H6, F8
|
|
|
|
G6?, D6?
|
H6, G7
|
|
|
|
H7
|
I6
|
|
|
|
I7, H8
|
E8, G7, H7
|
|
|
|
K10, J9, J7
|
F7,H7, D9, I6, G9, E8, D8
|
|
|
|
G7, K10, J9
|
D3
|
|
|
|
G7, E7, H6
|
I5
|
|
|
|
G7, A4, E5
|
-
|
The move A2
This move is probably the weakest of the three, but still good as a second and third row ladder escape, as well as for the two leftmost templates above. This is why I think it still can very well be swapped. What to respond to I10 I'm not sure though.
|
|
|
|
|
|
|
|
|
|
|
|
|
|
|
|
|
|
|
|
|
|
|
|
|
|
|
|
|
|
|
|
|
|
|
|
|
|
|
|
Other moves
The following is a list of other, less commonly encountered, moves and possible responses. What isn't yet considered are moves along the middle A row. It seems these kinds of moves require quite a different strategy to tackle.
|
|
|
|
|
|
|
|
|
|
|
|
|
|
|
|
|
|
|
|
|
|
|
|
|
|
|
|
|
|
|
|
|
|
|
|
|
|
|
|
|
|
|
|
|
|
|
|
|
|
|
|
|
|
|
|
|
|
|
|
|
|
|
|
|
|
|
|
|
|
|
|
|
|
|
|
|
|
|
|
|
|
|
|
|
|
|
|
|
|
|
|
|
|
|
|
|
|
|
|
|
|
|
|
|
Fourth, fifth move...
This is where the tough part comes... to actually play Hex :-) One thing important in early games seems to be to cover ground placing far apart from both your own and your opponent's stones rather than building small chains. Another common strategy seems to be to build walls in the same direction as your edge (see figure). These build in both directions and can be seen as a half-move in both directions. It also hinders the opponent a little to get around from both sides. These walls can extend quite long, I've seen five or six in a row.


